1. Goto the View... Section. You'll notice that you can select between a Building Section, Wall Section, and Detail View. Select the Detail View. In the options bar you'll notice that you can "Reference other view" (for referencing a drafting view that is already present). Place a Detail Section. Now goto View... Callout and place a Detail Callout. You'll notice that graphically they look different but they serve the same purpose and function in much the same way. Beginners often overlook that one has the choice between these two Detail Annotation styles.
2. Place a building section line and select it. You'll notice two blue circular arrows show up at either end of the section line. Click on it to cycle through section tail types. You'll also notice a blue breakline in the center of the section. Click on it to break the section into segments.
3. Place a building section line and select it. In the options bar you can "Split Segment." Place your cursor anywhere on the section line and start splitting the section line into segments.
4. Sometimes section lines disappear. Right click on the section and you can "Hide annotation in view." Goto the sections properties and you'll notice the parameter "Hide at scales coarser than." If your view is at a scale coarser than the parameter shown then the section annotation will disappear.
5. You can goto Settings... View tags... Section tags... to change the look of building, wall, and detail section annotations. Goto Settings.. View tags... Callout tags... to change the look of detail callouts. You can only choose from loaded Section and Callout Head annotation symbols. Edit those families for more custom heads.
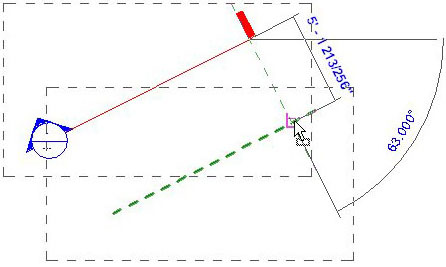
Now a common problem is how do I get a section line EXACTLY where I want it?
Let's say you wanted a section at a very specific angle and at a very specific place in plan view that is not orthogonal. Just draw a reference plane at the angle you want (and in the location you want for your section line) then place your section line adjacent to the reference plane. The section line will snap to the angle of an adjacent reference plane but won't snap to the reference plane itself. Now, to align your section line with the reference plane the align tool isn't going to work. So, select the move tool, hover over the section tail (revit will snap to the section line), and just move the section from it's present location to the reference plane.
One last thing. If you don't like the look of Revit's Elevation tag you could design your own section head (for use as an elevation tag) and use these modified sections instead of the given elevation tags.
1 comment:
Thanks for putting down this summary.
Are there any way to draw the section marks with a default gap between the segments? At the moment you have first place the section mark and then click the blue "Gaps in segment" break line.
Cheers,
Jonas
Post a Comment